
Sarah here - and this month for my Imaginarium Designs projects I decided to have some Mixed Media Fun - Finnabair style!
~~~~~~~~~~~~~~~
Precious Baby Boy
Mixed Media Canvas
Mixed Media Canvas
First up, is a mixed media canvas featuring a sweet photo of my son when he was 4-months old - what a cutie! I was lucky enough to take some classes with Finnabair in July, so this canvas was created with the techniques I learned from her!

All the colour on this canvas was achieved with Starburst mists from Lindy's Stamp Gang, with the exception of the Gold - which is dry-brushed Luminarte Silks Acrylic Glaze (Emperor's Gold). The black/white areas are achieved with black/white gesso. Here are some close-ups of the chipboard so you can see the effects of the misting/gesso/dry brushing.


Imaginarium Designs Chipboard Used
Precious Baby Boy - IDP0083

Hot Air Balloons on Board - IDS0010

Small Clock Face - IDS0036

Balloons Board Small - IDT0010

Monarch Butterfly Small - IDT0031

Lou's Heart Shapes - IDDL0015

Other Materials Used
Q-Artist Quality Stretched Canvas; Lace - Tresors De Luxe Etsy; Mod Podge Matte; A.Mantegna Super Heavy Gel Medium; Lindy's Stamp Gang Starbursts - Wild Honeysuckle Coral (SS-52); Opal Sea Oats (SS-38); Edelweiss Moss Green (SS-21); Prima - Finnabair - Sunrise Sunset Vintage Trinkets, Paper Flowers, Bottle Caps, Metal Flowers, Mechanicals; Prima Resin Feathers; Prima Mini Roses (white); Cousin Glass Pearls; Buttons (stash); White Gesso; Black Gesso; Luminarte Silks Acrylic Glaze - Emperor's Gold.
~~~~~~~~~~~~~~~
Simple Things Matter Most
Mixed Media Art Journal Page
Mixed Media Art Journal Page
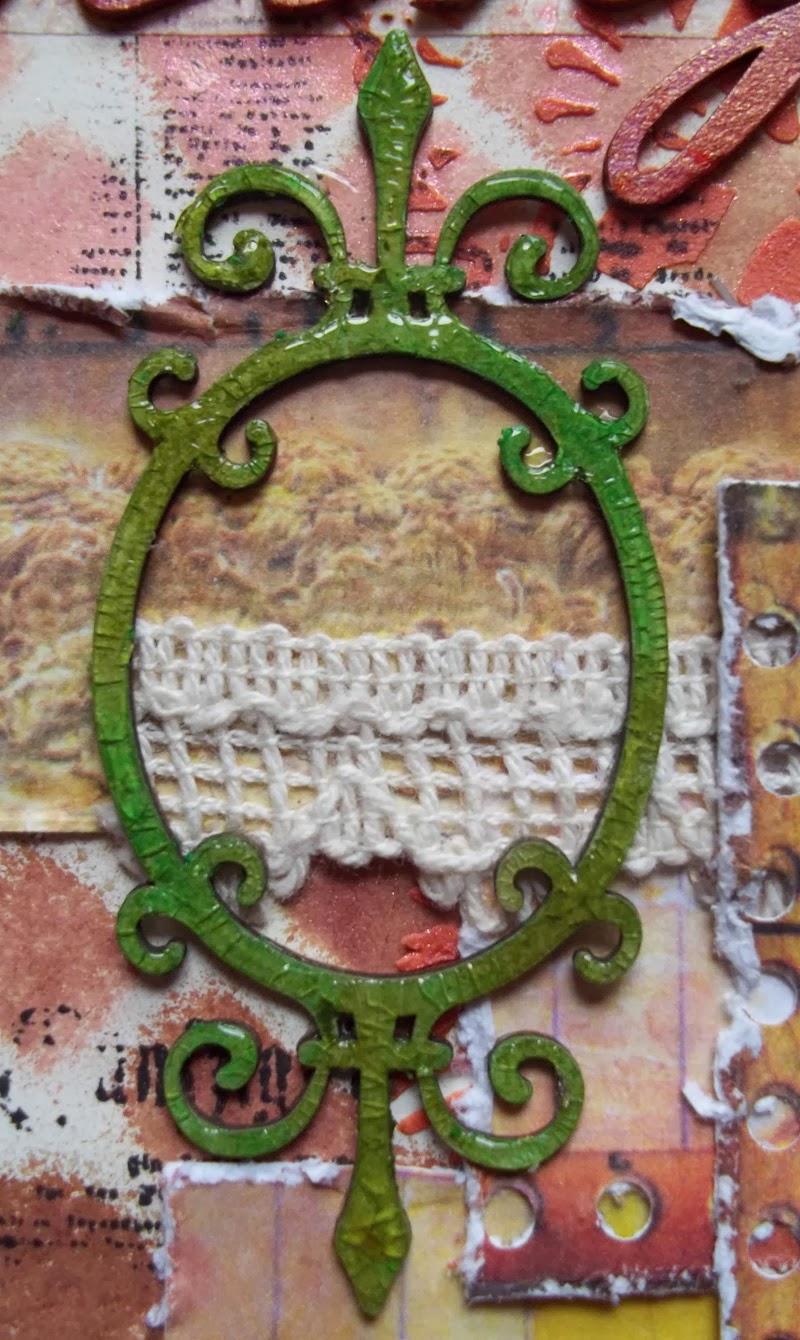
Next, is a mixed media Art Journal page created with lots of mists, paint, gelatos and some coloured molding paste too! I made this page to remind myself that it isn't the big gestures that matter - it is the little things you do with your children that make a big impact - such as my weekly trip to the library with my son (which he loves) or taking the time to be a parent volunteer on a school field trip! Here are a couple of shots of the journal pages - in the album and cropped without the album .


For the title, I first cut the Simple Things Matter Most title into two separate pieces, then I painted each secition in a colour a gradient (purple>coral>orange) with three colours of Luminarte Silks Acrylic glaze (Pomegranate, Coral Berry and Spiced Pumpkin). The frames were coloured with two different tones of green gelatos and then coated with Ranger Crackle Accents - I have a simple tutorial on this technique below! Here is a close-up of the chipboard elements of this Art Journal page.

Imaginarium Designs Chipboard Used
Simple Things Matter Most - IDP0031

Oval Frames - IDT0002

Drawing Paper; Masking Tape; Plastic Mesh Fencing; Light Molding Paste; Luminarte Primary Elements Pigment - Mandarin Blush; Prima - Finnabiar - 6x6 Stencil - Doily; Prima - Finnabair - 12x12 Stencil - Fishnet; Lindy's Stamp Gang Starbursts - Cocoa Bean Copper (SS-18), Edelweiss Moss Green (SS-21); Wild Honeysuckle Coral (SS-22); Lindy's Stamp Gang Moonshadow Mist - Van Dyke Sepia (MSM-24); Jolee's Boutique Lace Border (French General); Luminarte Silks Acrylic Glaze - Pomegranate, Coral Berry, Spiced Pumpkin; Prima - Finnabair - Clear Stamps - Harlequin and Book Page; Memento Dye Ink - Tuxedo Black; Prima Sunrise Sunset Paper - Corona; Faber-Castell Gelatos - Pistachio and Lime; Ranger Crackle Accents.
~~~~~~~~~~~~~~~
"Cracked Glass" Frame Tutorial
I thought I would share a really simple photo tutorial as to how I created the frames on my Simple Things Matter Most Art Journal page.
Supplies:
Imaginarium Designs Chipboard
Two Colours of Faber-Castell Gelatos (I have used Pistachio and Lime)
Water
Ranger Crackle Accents
1. Start out with your Chipboard and Gelatos.

2. Randomly colour the chipboard with the two colours of gelatos.
(Looks pretty horrific right now, right? Don't worry - it gets a lot better!)
(Looks pretty horrific right now, right? Don't worry - it gets a lot better!)

3. Lightly blend the gelatos together with a damp finger (not too wet - or you'll smudge all the colour together and you won't get the two-toned effect we're going for). You may want to add a little more of each colour here and there until you get a good two-toned appearance. It is pretty subtle right now - but wait for the next step!

4. Coat the coloured chipboard with a generous coat of Ranger Crackle Accents. And then wait for it to dry (and wait and wait and wait.....You can use a hair dryer to help speed this along but I don't recommend using a heat gun - the intense heat tends to make the wet chipboard smoke.....I speak from experience.)

5. Finally, the finished "Cracked Glass" frame on the Art Journal Page - isn't it pretty?!
~~~~~~~~~~~~~~~
Well, thanks for sticking with me to the end of this long post - I hoped you like my projects and tutorial! I'll have more details on how I created these projects on my blog over the next week - hope you'll stop by! Don't forget to leave a comment on THIS POST for a chance to win some fabulous Imaginarium Designs chipboard! See you next month!

Such amazing projects! I especially love that gorgeous mixed media project!
ReplyDeleteBeautiful projects…loving the mixed media!!!! xo
ReplyDeleteSo wonderful projects!!
ReplyDelete